Bài viết được sự cho phép của tác giả Nguyễn Hữu Khanh
Như đã biết, trong Java để khởi tạo một instance của một class chúng ta sẽ sử dụng từ khóa new. Tuy nhiên, trong một số trường hợp chúng ta cần tạo một instance khi chỉ biết tên class hoặc private constructor hoặc không biết được số lượng tham số của constructor,… Với những trường hợp như vậy, chúng ta không thể gọi từ khóa new một cách trực tiếp mà sẽ sử dụng một số cách đặc biệt và chúng ta sẽ cùng tìm hiểu các cách giải quyết vấn đề này trong phần tiếp theo của bài viết.
Sử dụng Reflection khi biết tên class
Một trong những cách đơn giản và thường được sử dụng để tạo instance của một class là sử dụng kỹ thuật Reflection. Nếu bạn chưa biết về Reflection, hãy dành chút thời gian xem lại bài viết Hướng dẫn sử dụng Java Reflection.

Sử dụng newInstance() khi class có constructor không có tham số và phạm vi truy cập không phải private
package com.gpcoder.instance;

public class Employee {

    private int id;

    private String name;

    public Employee() {
        super();
    }

    public Employee(int id, String name) {
        super();
        this.id = id;
        this.name = name;
    }

    public void setId(int id) {
        this.id = id;
    }

    public void setName(String name) {
        this.name = name;
    }

    @Override
    public String toString() {
        return "Employee [id=" + id + ", name=" + name + "]";
    }
}
Tạo instance sử dụng newInstance():
package com.gpcoder.instance;

import java.lang.reflect.InvocationTargetException;

public class NewInstanceExample {

    public static void main(String[] args)
            throws ClassNotFoundException, InstantiationException, IllegalAccessException, IllegalArgumentException,
            InvocationTargetException, NoSuchMethodException, SecurityException {

        // Get class based on the given class name
        Class<?> clazz = Class.forName("com.gpcoder.instance.Employee");

        // Create a new instance with empty argument of constructor of a class
        Employee employee = (Employee) clazz.newInstance();
        employee.setId(1);
        employee.setName("gpcoder");
        System.out.println("employee: " + employee);
    }
}
Lưu ý:
- Nếu không tồn tại constructor không có tham số, chương trình sẽ throw ra một exception như sau:
Exception in thread "main" java.lang.InstantiationException: com.gpcoder.instance.Employee
    at java.lang.Class.newInstance(Class.java:427)
    at com.gpcoder.instance.NewInstanceExample.main(NewInstanceExample.java:15)
Caused by: java.lang.NoSuchMethodException: com.gpcoder.instance.Employee.<init>()
    at java.lang.Class.getConstructor0(Class.java:3082)
    at java.lang.Class.newInstance(Class.java:412)
    ... 1 more
- Nếu constructor không tham số có phạm vi truy cập là private, chương trình sẽ throw ra exception sau:
Exception in thread "main" java.lang.IllegalAccessException: Class com.gpcoder.instance.NewInstanceExample can not access a member of class com.gpcoder.instance.Employee with modifiers "private"
    at sun.reflect.Reflection.ensureMemberAccess(Reflection.java:102)
    at java.lang.Class.newInstance(Class.java:436)
    at com.gpcoder.instance.NewInstanceExample.main(NewInstanceExample.java:15)
Sử dụng getConstructor() khi constructor của class là public
Chúng ta sẽ tạo instance của class Employee sử dụng phương thức getConstructor():
package com.gpcoder.instance;

import java.lang.reflect.Constructor;
import java.lang.reflect.InvocationTargetException;

public class ConstructorNewInstanceExample {

    public static void main(String[] args)
            throws ClassNotFoundException, InstantiationException, IllegalAccessException, IllegalArgumentException,
            InvocationTargetException, NoSuchMethodException, SecurityException {

        // Get class based on the given class name
        Class<?> clazz = Class.forName("com.gpcoder.instance.Employee");

        // Get all constructor of the class
        Constructor<?>[] allConstructors = clazz.getConstructors();
        for (Constructor<?> constructor : allConstructors) {
            Class<?>[] parameters = constructor.getParameterTypes();
            if (parameters.length == 0) {
               // Create a new instance without parameter
               Employee employee1 = (Employee) constructor.newInstance();
               employee1.setId(1);
               employee1.setName("gpcoder 1");
               System.out.println("employee1: " + employee1);
            } else if (parameters.length == 2) {
               // Create a new instance with two parameters
               Employee employee2 = (Employee) constructor.newInstance(2, "gpcoder 2");
               System.out.println("employee2: " + employee2);
            }
        }

        // Create a new instance with specific constructor of class
        Constructor<?> constructor = clazz.getConstructor(int.class, String.class);
        Employee employee3 = (Employee) constructor.newInstance(3, "gpcoder 3");
        System.out.println("employee3: " + employee3);
    }
}
Output của chương trình:
employee1: Employee [id=1, name=gpcoder 1]
employee2: Employee [id=2, name=gpcoder 2]
employee3: Employee [id=3, name=gpcoder 3]
Cập nhật việc làm Java đãi ngộ hấp dẫn trên TopDev
Sử dụng getDeclaredConstructor() khi constructor của class là private
Ví dụ:
package com.gpcoder.instance;

public class PrivateEmployee {

    private int id;

    private String name;

    private PrivateEmployee(int id, String name) {
        super();
        this.id = id;
        this.name = name;
    }

    @Override
    public String toString() {
        return "PrivateEmployee [id=" + id + ", name=" + name + "]";
    }
}
Sử dụng getDeclaredConstructor() khi các constructor của class là private:
package com.gpcoder.instance;

import java.lang.reflect.Constructor;
import java.lang.reflect.InvocationTargetException;

public class PrivateConstructorNewInstanceExample {

    public static void main(String[] args)
            throws ClassNotFoundException, InstantiationException, IllegalAccessException, IllegalArgumentException,
            InvocationTargetException, NoSuchMethodException, SecurityException {

        // Get class based on the given class name
        Class<?> clazz = Class.forName("com.gpcoder.instance.PrivateEmployee");

        // Get the private constructor.
        Constructor<?> constructor = clazz.getDeclaredConstructor(int.class, String.class);

        // Since it is private, make it accessible.
        constructor.setAccessible(true);

        // Create a new instance with specific constructor of class
        PrivateEmployee employee = (PrivateEmployee) constructor.newInstance(1, "gpcoder");
        System.out.println("employee: " + employee);
    }
}
Output của chương trình:
employee: PrivateEmployee [id=1, name=gpcoder]
Sử dụng Object.clone() để tạo một instance từ một instance khác
Để sử dụng phương thức clone(), class cần implement interface java.lang.Cloneable và override phương thức clone(). Chi tiết các bạn xem lại bài viết Object cloning trong java.
package com.gpcoder.instance;

public class Programer implements Cloneable {

    private int id;

    private String name;

    public Programer(int id, String name) {
        super();
        this.id = id;
        this.name = name;
    }

    public int getId() {
        return id;
    }

    public void setId(int id) {
        this.id = id;
    }

    public String getName() {
        return name;
    }

    public void setName(String name) {
        this.name = name;
    }

    @Override
    protected Programer clone() throws CloneNotSupportedException {
        return (Programer) super.clone();
    }

    @Override
    public String toString() {
        return "Programer [id=" + id + ", name=" + name + "]";
    }
}
Tạo new instance từ clone()
package com.gpcoder.instance;

public class CloneExample {

    public static void main(String[] args) throws CloneNotSupportedException {
        Programer obj1 = new Programer(1, "gpcoder");
        Programer obj2 = obj1.clone();
        obj2.setName(obj2.getName().toUpperCase());

        System.out.println(obj1);
        System.out.println(obj2);
    }
}
Output chương trình:
Programer [id=1, name=gpcoder]
Programer [id=1, name=GPCODER]
Tạo new instance sử dụng serialization và deserialization
Chúng ta có thể tạo một instance cho một class bằng cách sử dụng Deserialization từ một data object đã được Serialization. Khi sử dụng deserialization, JVM sẽ không sử dụng bất kỳ constructor nào để tạo instance. Chi tiết các bạn xem lại bài viết Serialization và Deserialization trong java.
Giả sử chúng ta cần tạo instance cho class sau:
package com.gpcoder.instance;

import java.io.Serializable;

public class StudentSerializable implements Serializable {

    private static final long serialVersionUID = 1427461703707854023L;

    private int id;
    private String name;

    public StudentSerializable(int id, String name) {
        this.id = id;
        this.name = name;
    }

    @Override
    public String toString() {
        return "StudentSerializable [id=" + id + ", name=" + name + "]";
    }
}
Bây giờ chúng ta sẽ tạo một đối tượng đã được Serialize và lưu vào một nơi nào đó (có thể lưu trữ ở một nơi nào đó tách biệt hoặc nhận từ một service khác). Sau đó, chúng ta đọc file này và tạo instance sử dụng Deserialize.
package com.gpcoder.instance;

import java.io.File;
import java.io.FileInputStream;
import java.io.FileNotFoundException;
import java.io.FileOutputStream;
import java.io.IOException;
import java.io.ObjectInputStream;
import java.io.ObjectOutputStream;

public class DeserializationNewInstanceExample {

    public static void main(String[] args) throws FileNotFoundException, ClassNotFoundException, IOException {
        File file = File.createTempFile("student", "txt");
        serialize(file);
        deserialize(file);
    }

    private static void serialize(File file) throws FileNotFoundException, IOException, ClassNotFoundException {
        try (ObjectOutputStream oos = new ObjectOutputStream(new FileOutputStream(file))) {
            StudentSerializable student = new StudentSerializable(1, "gpcoder");
            oos.writeObject(student);
            oos.flush();
            System.out.println("Serialized");
        }
    }

    private static void deserialize(File file) throws FileNotFoundException, IOException, ClassNotFoundException {
        try (ObjectInputStream ois = new ObjectInputStream(new FileInputStream(file))) {
            StudentSerializable student = (StudentSerializable) ois.readObject();
            System.out.println(student);
            System.out.println("Deserialized");
        }
    }
}
Output chương trình:
Serialized
StudentSerializable [id=1, name=gpcoder]
Deserialized
Sử dụng thư viện Objenesis
Objenesis là gì?
Một số hạn chế của các cách ở trên:
- Với phương thức Class.newInstance(), class của chúng ta bắt buộc phải có constructor không có tham số.
- Với Class.getDeclaredConstructor() hoặc Class.getConstructor(), chúng ta phải xác định chính xác số lượng tham số và kiểu dữ liệu của từng tham số.
- Với Object.clone(), class của chúng ta phải implement một interface Clonable.
- Với serialization và deserialization, class của chúng ta phải implement một interface Serializable.
Ngoài ra, một số trường hợp chúng ta có thể gặp phải khi tạo instance thông qua constructor như:
- Trong constructor có throw exception, chẳng hạn private constructor của singleton hay util class có thể throw exception trực tiếp trong constructor.
- Trong constructor gọi rất nhiều xử lý khác, nó làm chậm quá trình khởi tạo instance và chúng ta cũng không cần dữ liệu khởi tạo đó.
Để có thể tạo một instance cho một class mà không gặp bất kỳ hạn chế trên, chúng ta có thể sử dụng thư viện Objenesis.
Objenesis là một thư viện mã nguồn mở của Java, nó được sử dụng để tạo instance của một class đặc biệt mà không thông qua constructor.
Cài đặt Objenesis
Thêm thư viện Objenesis vào project vào project maven:
<!-- https://mvnrepository.com/artifact/org.objenesis/objenesis -->
        <dependency>
            <groupId>org.objenesis</groupId>
            <artifactId>objenesis</artifactId>
            <version>3.0.1</version>
        </dependency>
Ví dụ sử dụng Objenesis
Giả sử chúng ta có một class có constructor là private và trong constructor này có throw một exception.
package com.gpcoder.instance;

public class ProductFactory {

    private ProductFactory() {
        throw new UnsupportedOperationException("Cannot call the contructor directly");
    }

    public void doSomething(String factory) {
        System.out.println("Working on " + factory);
    }
}
Như bạn thấy, với những cách đã giới thiệu ở trên chúng ta không thể khởi tạo được instance của class này. Bây giờ hãy xem cách sử dụng Objenesis:
package com.gpcoder.instance;

import org.objenesis.Objenesis;
import org.objenesis.ObjenesisStd;
import org.objenesis.instantiator.ObjectInstantiator;

public class ObjenesisExample {

    public static void main(String[] args) {
        // Step 1: Create objenesis
        Objenesis objenesis = new ObjenesisStd(); // or ObjenesisSerializer

        // Step 2: Create instantiator with the specific ProductFactory type
        // Try to reuse the ObjectInstantiator objects as much as possible to improve performance
        // It can be shared between multiple threads and used concurrently
        ObjectInstantiator<?> instantiator = objenesis.getInstantiatorOf(ProductFactory.class);

        // Step 3: Create new instance of the ProductFactory type
        ProductFactory productFactory1 = (ProductFactory) instantiator.newInstance();
        ProductFactory productFactory2 = (ProductFactory) instantiator.newInstance();
        ProductFactory productFactory3 = (ProductFactory) instantiator.newInstance();

        // Step 4: Use the instances
        System.out.println("productFactory1: " + productFactory1);
        System.out.println("productFactory2: " + productFactory2);
        System.out.println("productFactory3: " + productFactory3);

        productFactory1.doSomething("factory1");
        productFactory2.doSomething("factory2");
        productFactory3.doSomething("factory3");
    }
}
Output của chương trình:
productFactory1: com.gpcoder.instance.ProductFactory@5cad8086
productFactory2: com.gpcoder.instance.ProductFactory@6e0be858
productFactory3: com.gpcoder.instance.ProductFactory@61bbe9ba
Working on factory1
Working on factory2
Working on factory3
Lưu ý: Do Objenesis khởi tạo đối tượng không thông qua constructor nên các giá trị khởi tạo trong constructor sẽ không tồn tại. Do đó, chúng ta cần gán lại các giá trị cho đối tượng trước khi gọi các phương thức của nó.
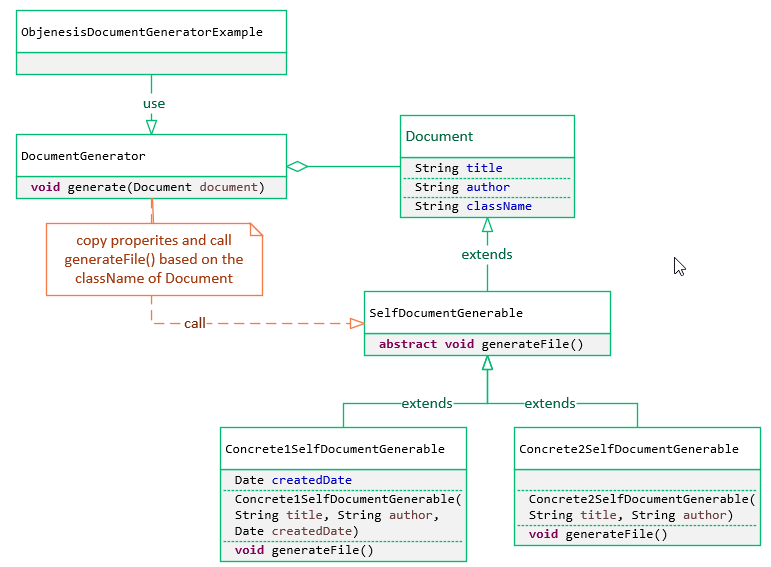
Ví dụ chúng ta có một class Document. Class này ban đầu chỉ chứa thông tin về document. Sau đó, hệ thống cần xuất dữ liệu document ra file và mỗi loại document có cách xuất dữ liệu/ biểu mẫu khác nhau. Do đó, chúng ta thêm một field className để lưu thông tin tên concrete class. Chúng ta có cấu trúc như sau:
Code chương trình:
Document.java

package com.gpcoder.instance.objenesis;

public class Document {

    private String title;
    private String author;
    private String className;

    public String getTitle() {
        return title;
    }

    public void setTitle(String title) {
        this.title = title;
    }

    public String getAuthor() {
        return author;
    }

    public void setAuthor(String author) {
        this.author = author;
    }

    public String getClassName() {
        return className;
    }

    public void setClassName(String className) {
        this.className = className;
    }
}
SelfDocumentGenerable.java
package com.gpcoder.instance.objenesis;

public abstract class SelfDocumentGenerable extends Document {

    public abstract void generateFile();
}
Concrete1SelfDocumentGenerable.java
package com.gpcoder.instance.objenesis;

import java.util.Date;

public class Concrete1SelfDocumentGenerable extends SelfDocumentGenerable {

    private Date createdDate;

    public Concrete1SelfDocumentGenerable(String title, String author, Date createdDate) {
        setTitle(title);
        setAuthor(author);
        this.createdDate = createdDate;
    }

    @Override
    public void generateFile() {
        System.out.printf("Concrete1: %s - %sn", getTitle(), getAuthor());
    }
}
Concrete2SelfDocumentGenerable.java
package com.gpcoder.instance.objenesis;

public class Concrete2SelfDocumentGenerable extends SelfDocumentGenerable {

    public Concrete2SelfDocumentGenerable(String title, String author) {
        setTitle(title);
        setAuthor(author);
    }

    @Override
    public void generateFile() {
        System.out.printf("Concrete2: %s - %sn", getTitle(), getAuthor());
    }
}
Như bạn thấy, mỗi concrete class có constructor với các tham số khác nhau, chúng ta không thể gọi từ khóa new một cách trực tiếp, không thể gọi phương thức newInstance() do không chắc chắn các concrete class có constructor không tham số hay không và cũng không thể xác định chính xác các tham số của constructor nên không thể sử dụng getConstructor(). Trường hợp này, chúng ta sẽ sử dụng Objenesis để tạo instance.
Do Objenesis tạo instance không thông qua constructor nên chúng ta phải gán lại các giá trị title và author cho phương thức generateFile() sử dụng.
DocumentGenerator.java
package com.gpcoder.instance.objenesis;

import org.objenesis.Objenesis;
import org.objenesis.ObjenesisStd;
import org.objenesis.instantiator.ObjectInstantiator;

public class DocumentGenerator {

    public static void generate(Document document) throws ClassNotFoundException {
        Objenesis objenesis = new ObjenesisStd();
        Class<?> clazz = Class.forName(document.getClassName());
        ObjectInstantiator<?> instantiator = objenesis.getInstantiatorOf(clazz);
        SelfDocumentGenerable selfDocumentGenerable = (SelfDocumentGenerable) instantiator.newInstance();
        copyProperties(document, selfDocumentGenerable);
        selfDocumentGenerable.generateFile();
    }

    private static void copyProperties(Document src, Document target) {
        target.setTitle(src.getTitle());
        target.setAuthor(src.getAuthor());
    }
}
ObjenesisDocumentGeneratorExample.java
package com.gpcoder.instance.objenesis;

public class ObjenesisDocumentGeneratorExample {

    public static void main(String[] args) throws ClassNotFoundException {
        Document document = new Document();
        document.setTitle("Doc1");
        document.setAuthor("gpcoder1");
        document.setClassName(Concrete1SelfDocumentGenerable.class.getCanonicalName());
        DocumentGenerator.generate(document);

        document = new Document();
        document.setTitle("Doc2");
        document.setAuthor("gpcoder2");
        document.setClassName(Concrete2SelfDocumentGenerable.class.getCanonicalName());
        DocumentGenerator.generate(document);
    }
}
Output của chương trình:
Concrete1: Doc1 - gpcoder1
Concrete2: Doc2 - gpcoder2