Bài viết được sự cho phép của tác giả Lê Xuân Quỳnh
Bài này mình dùng 1 thư viện sửa rich text trên textview, có hình ảnh như sau:

Thư viện gốc nằm ở đây:

https://github.com/aryaxt/iOS-Rich-Text-Editor
Và vì thư viện này không hỗ trợ cài qua cocoapod nên mình sẽ tiến hành tạo pod cho nó. Mình sẽ lấy tên là QRichTextView và mong muốn sẽ cài bằng lệnh:
pod 'QRichTextView'Nào cùng tiến hành nhé.
Đầu tiên bạn cần tải sources code này về bằng dòng lệnh:
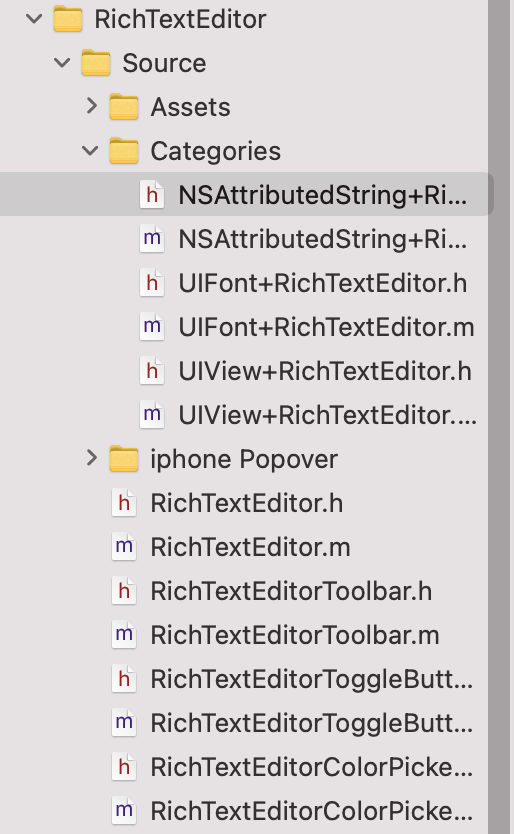
https://github.com/aryaxt/iOS-Rich-Text-EditorBây giờ ta thấy source code như sau:
 Sau khi phân tích thì mình nhận thấy các vấn đề sau:
- Source code này không có ARC – tự động dọn dẹp bộ nhớ, vì nó tạo cách đây 8 năm, cái thời xcode còn chưa hỗ trợ -> nên cần xóa toàn bộ các lệnh release, retain hay autorelease..
- Source đang để nhiều thư mục. Muốn tiến hành làm library và viết bớt script thì đưa vào 2 thư mục chính là Classes(chứa files .h và .m) và Assets(chứa các file ảnh).
- Có bug không đọc được ảnh khi chuyển sang project lib của mình.
Vậy chúng ta sẽ tiến hành tạo mới 1 framework bằng Xcode như sau:
- file -> new project -> Framework
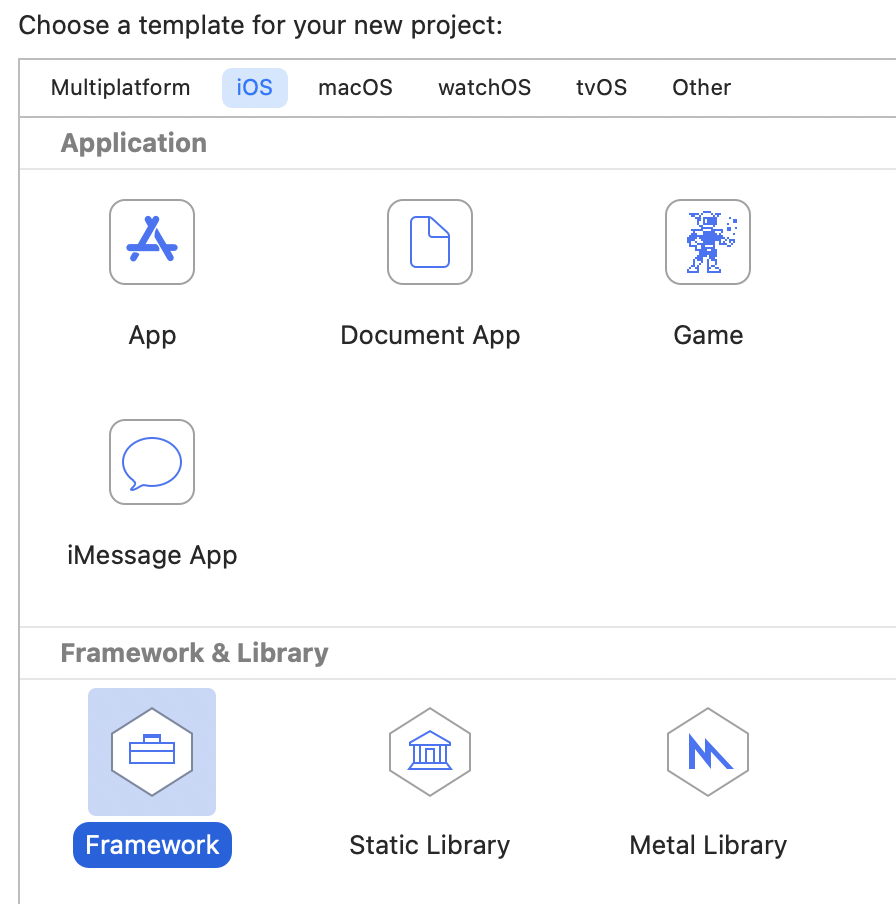
Đặt tên nó là QRichTextView(hoặc tên gì tùy bạn).
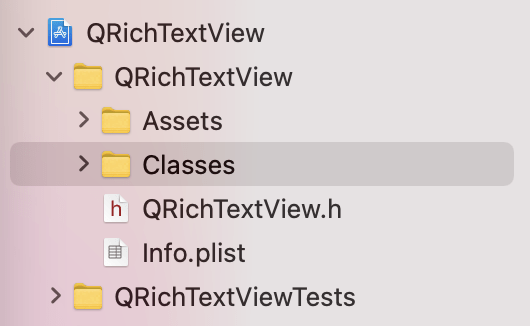
Tiếp theo tạo 2 thư mục chính Classes và Assets như hình:
 Sau đó sang source code của họ để copy toàn bộ các file .h và .m từ các thư mục Source, Categories, iphone Popover vào thư mục Classes của chúng ta. Làm tương tự với các file .png vào thư mục Assets.
- Bấm build thì được 1 đống lỗi. Những đoạn sau sẽ sinh ra lỗi:
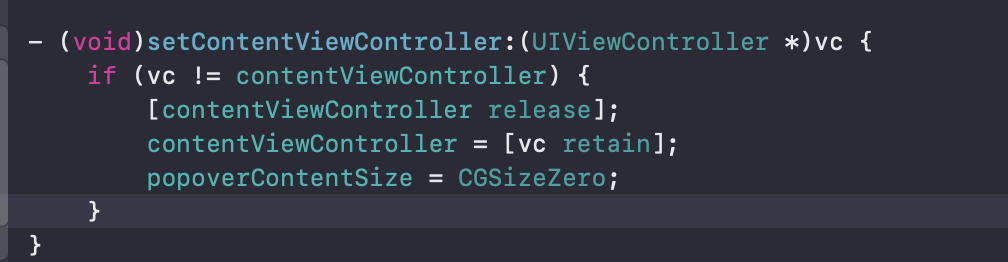
Xóa và sửa lại đơn giản hơn:

Các bạn tiến hành xóa và sửa hết, rồi build thành công. Tuy nhiên khi dùng framework này sẽ phải sửa thêm 1 đoạn code như sau để nó đọc được hình ảnh từ thư mục Asset sang:
 // Load image from framework
    NSBundle *frameWorkBundle = [NSBundle bundleForClass:[self class]];
    UIImage* tempImage = [UIImage imageNamed:image inBundle:frameWorkBundle compatibleWithTraitCollection:nil];
    ;
Đoạn code trên cần chỉ rõ đọc ảnh từ framework bundle, nếu không hình ảnh sẽ không load được.
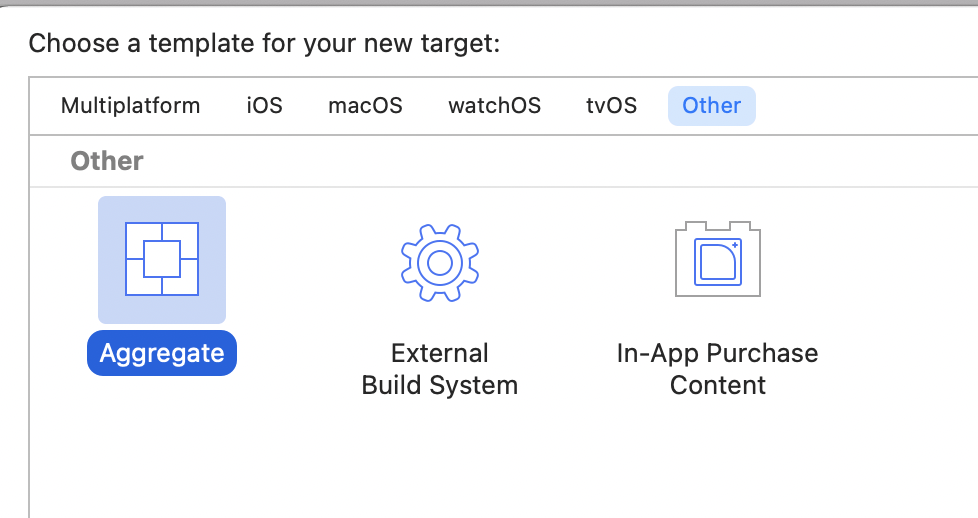
Bây giờ làm sao để build cho cả simulator và device? Mình sẽ tạo thêm 1 target gọi tên là universal như sau:
- Chọn file -> new target -> Aggregate và đặt tên là QRichTextView-Univesal như hình:
Tiếp theo bạn vào target này và chọn build Phases -> new run script phases và copy đoạn code dưới đây:
# Sets the target folders and the final framework product.
FMK_NAME=QRichTextView
FMK_VERSION=1.0

# Install dir will be the final output to the framework.
# The following line create it in the root folder of the current project.
INSTALL_DIR=${SRCROOT}/Products/${FMK_NAME}.framework

# Working dir will be deleted after the framework creation.
WRK_DIR=build
DEVICE_DIR=${WRK_DIR}/Release-iphoneos/${FMK_NAME}.framework
SIMULATOR_DIR=${WRK_DIR}/Release-iphonesimulator/${FMK_NAME}.framework

# Building both architectures.
xcodebuild -configuration "Release" -target "${FMK_NAME}" -sdk iphoneos
xcodebuild -configuration "Release" -target "${FMK_NAME}" -sdk iphonesimulator

# Cleaning the oldest.
if [ -d "${INSTALL_DIR}" ]
then
rm -rf "${INSTALL_DIR}"
fi

# Creates and renews the final product folder.
mkdir -p "${INSTALL_DIR}"
mkdir -p "${INSTALL_DIR}/Versions"
mkdir -p "${INSTALL_DIR}/Versions/${FMK_VERSION}"
mkdir -p "${INSTALL_DIR}/Versions/${FMK_VERSION}/Resources"
mkdir -p "${INSTALL_DIR}/Versions/${FMK_VERSION}/Headers"

# Creates the internal links.
# It MUST uses relative path, otherwise will not work when the folder is copied/moved.
ln -s "${FMK_VERSION}" "${INSTALL_DIR}/Versions/Current"
ln -s "Versions/Current/Headers" "${INSTALL_DIR}/Headers"
ln -s "Versions/Current/Resources" "${INSTALL_DIR}/Resources"
ln -s "Versions/Current/${FMK_NAME}" "${INSTALL_DIR}/${FMK_NAME}"

# Copies the headers and resources files to the final product folder.
cp -R "${DEVICE_DIR}/Headers/" "${INSTALL_DIR}/Versions/${FMK_VERSION}/Headers/"
cp -R "${DEVICE_DIR}/" "${INSTALL_DIR}/Versions/${FMK_VERSION}/Resources/"

# Removes the binary and header from the resources folder.
rm -r "${INSTALL_DIR}/Versions/${FMK_VERSION}/Resources/Headers" "${INSTALL_DIR}/Versions/${FMK_VERSION}/Resources/${FMK_NAME}"

# Uses the Lipo Tool to merge both binary files (i386 + armv6/armv7) into one Universal final product.
lipo -create "${DEVICE_DIR}/${FMK_NAME}" "${SIMULATOR_DIR}/${FMK_NAME}" -output "${INSTALL_DIR}/Versions/${FMK_VERSION}/${FMK_NAME}"

rm -r "${WRK_DIR}"
Sau đó bạn build và tạo ra 1 framework có tên là QRichTextView.framework như hình:
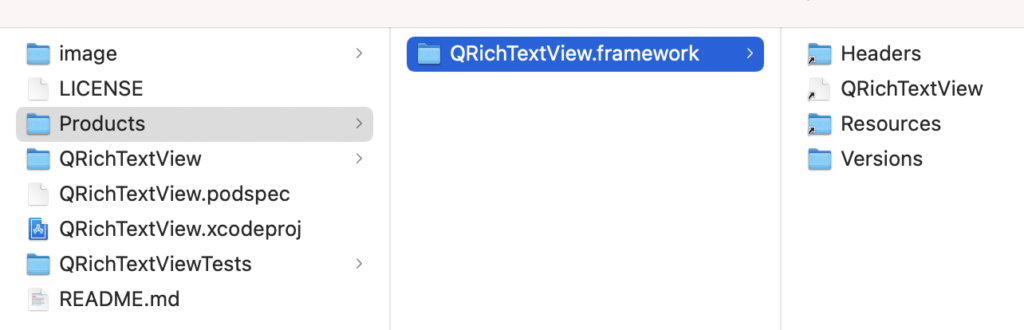
Bạn có thể kéo thả vào project của bạn và dùng thoải mái.
Đến đây chúng ta vẫn chưa thực sự tạo ra thư viện trên CocoaPod.
Bạn hãy lên github tạo 1 repository có tên là QRichTextView, sau đó tiến hành upload toàn bộ code của bạn lên:
> git init
> git remote add origin [email protected]:{USERNAME}/QRichTextView.git
> git add .
> git commit -m "Initial project setup"
> git push -u origin master
Repository của bạn cần có 2 file README and MIT License. Bạn làm như hình:
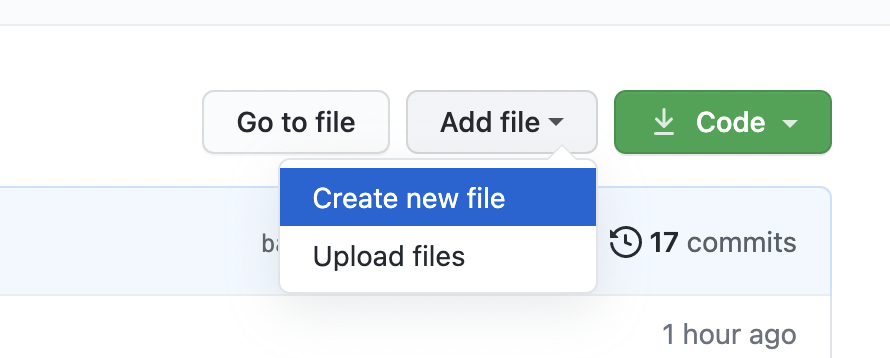 Sau đó thêm tên là README và LICENSE. Github sẽ gợi ý bạn chọn MIT license..
Viết unit test cho project
Cái này mình không có thời gian nên không làm.
Configure Travis CI
Ở đây bạn có thể vào trang chủ Travis CI để làm theo hướng dẫn. Có thể bỏ qua nếu chưa cần thiết.
Public thư viện
Bạn cần cài đặt CocoaPod để đẩy lên. Nếu chưa cài hãy gõ lệnh:
gem install cocoapodsSau đó gõ lệnh:
pod spec create QRichTextViewFile này chứa thông tin về version, tên thư viện, các source code, Asset, thông tin tác giả… để public thư viện lên cho cộng đồng. Bạn có thể sửa như sau:
#
#  Be sure to run `pod spec lint QRichTextView.podspec' to ensure this is a
#  valid spec and to remove all comments including this before submitting the spec.
#
#  To learn more about Podspec attributes see https://guides.cocoapods.org/syntax/podspec.html
#  To see working Podspecs in the CocoaPods repo see https://github.com/CocoaPods/Specs/
#

Pod::Spec.new do |spec|

  # ―――  Spec Metadata  ―――――――――――――――――――――――――――――――――――――――――――――――――――――――――― #
  #
  #  These will help people to find your library, and whilst it
  #  can feel like a chore to fill in it's definitely to your advantage. The
  #  summary should be tweet-length, and the description more in depth.
  #

  spec.name         = "QRichTextView"
  spec.version      = "0.0.3"
  spec.summary      = "Pod version for https://github.com/aryaxt/iOS-Rich-Text-Editor.git"

  # This description is used to generate tags and improve search results.
  #   * Think: What does it do? Why did you write it? What is the focus?
  #   * Try to keep it short, snappy and to the point.
  #   * Write the description between the DESC delimiters below.
  #   * Finally, don't worry about the indent, CocoaPods strips it!
  spec.description  = "Pod version for https://github.com/aryaxt/iOS-Rich-Text-Editor.git. You can the rich text view."

  spec.homepage     = "https://github.com/lexuanquynh/QRichTextView"
  # spec.screenshots  = "www.example.com/screenshots_1.gif", "www.example.com/screenshots_2.gif"


  # ―――  Spec License  ――――――――――――――――――――――――――――――――――――――――――――――――――――――――――― #
  #
  #  Licensing your code is important. See https://choosealicense.com for more info.
  #  CocoaPods will detect a license file if there is a named LICENSE*
  #  Popular ones are 'MIT', 'BSD' and 'Apache License, Version 2.0'.
  #

  spec.license      = { :type => "MIT", :file => "LICENSE" }
  # spec.license      = { :type => "MIT", :file => "FILE_LICENSE" }

  # ――― Author Metadata  ――――――――――――――――――――――――――――――――――――――――――――――――――――――――― #
  #
  #  Specify the authors of the library, with email addresses. Email addresses
  #  of the authors are extracted from the SCM log. E.g. $ git log. CocoaPods also
  #  accepts just a name if you'd rather not provide an email address.
  #
  #  Specify a social_media_url where others can refer to, for example a twitter
  #  profile URL.
  #

  spec.author             = { "Le Xuan Quynh" => "[email protected]" }
  # Or just: spec.author    = "Le Xuan Quynh"
  # spec.authors            = { "Le Xuan Quynh" => "[email protected]" }
  # spec.social_media_url   = "https://twitter.com/Le Xuan Quynh"

  # ――― Platform Specifics ――――――――――――――――――――――――――――――――――――――――――――――――――――――― #
  #
  #  If this Pod runs only on iOS or OS X, then specify the platform and
  #  the deployment target. You can optionally include the target after the platform.
  #

  # spec.platform     = :ios
  # spec.platform     = :ios, "5.0"

  #  When using multiple platforms
  spec.ios.deployment_target = "9.0"
  # spec.osx.deployment_target = "10.7"
  # spec.watchos.deployment_target = "2.0"
  # spec.tvos.deployment_target = "9.0"


  # ――― Source Location ―――――――――――――――――――――――――――――――――――――――――――――――――――――――――― #
  #
  #  Specify the location from where the source should be retrieved.
  #  Supports git, hg, bzr, svn and HTTP.
  #

  spec.source       = { :git => "https://github.com/lexuanquynh/QRichTextView.git", :branch => "main", :tag => "#{spec.version}" }


  # ――― Source Code ―――――――――――――――――――――――――――――――――――――――――――――――――――――――――――――― #
  #
  #  CocoaPods is smart about how it includes source code. For source files
  #  giving a folder will include any swift, h, m, mm, c & cpp files.
  #  For header files it will include any header in the folder.
  #  Not including the public_header_files will make all headers public.
  #

  spec.source_files  = "QRichTextView/Classes/*.{h,m}"
  # spec.exclude_files = "Classes/Exclude"

  spec.public_header_files = "QRichTextView/Classes/*.h"


  # ――― Resources ―――――――――――――――――――――――――――――――――――――――――――――――――――――――――――――――― #
  #
  #  A list of resources included with the Pod. These are copied into the
  #  target bundle with a build phase script. Anything else will be cleaned.
  #  You can preserve files from being cleaned, please don't preserve
  #  non-essential files like tests, examples and documentation.
  #

  # spec.resource  = "icon.png"
  spec.resources = "QRichTextView/Assets/*.png"

  # spec.preserve_paths = "FilesToSave", "MoreFilesToSave"


  # ――― Project Linking ―――――――――――――――――――――――――――――――――――――――――――――――――――――――――― #
  #
  #  Link your library with frameworks, or libraries. Libraries do not include
  #  the lib prefix of their name.
  #

  # spec.framework  = "SomeFramework"
  # spec.frameworks = "SomeFramework", "AnotherFramework"

  # spec.library   = "iconv"
  # spec.libraries = "iconv", "xml2"


  # ――― Project Settings ――――――――――――――――――――――――――――――――――――――――――――――――――――――――― #
  #
  #  If your library depends on compiler flags you can set them in the xcconfig hash
  #  where they will only apply to your library. If you depend on other Podspecs
  #  you can include multiple dependencies to ensure it works.

  # spec.requires_arc = true

  # spec.xcconfig = { "HEADER_SEARCH_PATHS" => "$(SDKROOT)/usr/include/libxml2" }
  # spec.dependency "JSONKit", "~> 1.4"

end
Trong đó:
- spec.name là tên thư viện
- spec.version: phiên bản thư viện
- spec.summary: mô tả ngắn của thư viện
- spec.homepage: trang chủ của thư viện
- spec.license: License thư viện
- spec.author: Thông tin tác giả
- spec.ios.deployment_target: minimum os hỗ trợ
- spec.source: source code khi cài
- spec.source_files: để build
- spec.public_header_files: Các header có thể sử dụng sau khi build thành công
- spec.resources: Hình ảnh sử dụng trong thư viện
Sau đó các bạn tiến hành commit và đẩy code lên nhánh trên git của mình:
git commit -am "add all"
git add .
git commit -m "add all files"
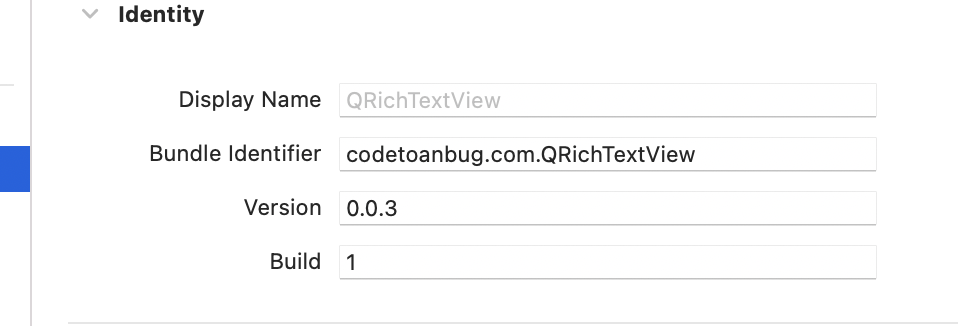
git push origin masterMỗi thư viện cần đánh số version. Ở đây do lần đầu tạo nên tôi đánh số 0.0.1. Lưu ý là số này ở spec.version và trên project setting phải giống nhau:
Sau đó bạn đẩy tag này lên git:
git tag 0.0.1
git push origin 0.0.1
Tiến hành build thư viện bằng lệnh và bỏ qua các cảnh báo do mình chưa fix hết:
pod lib lint --allow-warningsVà gõ tiếp lệnh sau để đăng ký trên git org tương tự lệnh sau:
pod trunk register [email protected] 'Codetoanbug' --description='macbook pro'
Và cuối cùng gõ lệnh để public thư viện của bạn:
pod trunk push --allow-warningsKhi nhận được thông báo như sau là bạn đã public thành công:
 Bạn đợi tầm 30 phút đến vài tiếng để pod có thể index lại thư viện. Sau đó bạn gõ lệnh sau để update pod của bạn:
pod repo updateĐây là thư viện tôi vừa tạo:
https://github.com/lexuanquynh/QRichTextView
Bạn có thể cài bằng pod với lệnh sau:
pod 'QRichTextView'Hoặc xem thêm ở file Readme để hiểu cách dùng.
Update: Cho các lần fix bug sau, bạn chỉ cần làm theo các bước:
- Fix bug và commit lên master
- Thay đổi version trong bundle version và file podspec, ví dụ 0.0.x(x phải tăng lên 1 so với version cũ).
- Tạo version mới bằng cách gõ:
git tag 0.0.x
git push origin 0.0.x
Với x là số tăng lên 1 đơn vị cho các thay đổi nhỏ. Để hiểu thêm cách đặt tên tag các bạn có thể google.
Sau đó là các lệnh sau để build và update lên CocoaPod:
pod lib lint --allow-warnings
pod trunk push --allow-warnings
Nếu có lỗi hãy comment ở dưới bài viết nhé. Gook luck.
Xem thêm tại https://www.facebook.com/codetoanbug
Bài viết gốc được đăng tải tại codetoanbug.com
Có thể bạn quan tâm:
- GitHub là gì?
- RxSwift 5: Cài đặt RxSwift
- Lập trình IOS: Làm sao để viết code swift đúng chuẩn thế giới?
- Lập trình IOS: Triển khai MVVM cho project swift(phần 2)
Xem thêm Việc làm IT hấp dẫn trên TopDev