Bài viết được sự cho phép của tác giả Nguyễn Hữu Khanh
Maven Archetype là một tính năng của Maven, các bạn hiểu nôm na là nó cho phép chúng ta tạo nhanh một Maven project với cấu trúc đã được định nghĩa sẵn. Chúng ta chỉ cần thay đổi những giá trị như Group Id, Artifact Id hay Version theo giá trị mà chúng ta muốn mà thôi. Mình thì mình hay sử dụng các Maven Archetype định nghĩa cấu trúc của các project Spring hay Jakarta EE. Trong bài viết này, mình sẽ hướng dẫn các bạn cách hiện thực một Maven archetype để nếu các bạn có ý định hiện thực một Maven Archetype cho riêng mình thì có thể dựa vào hướng dẫn của mình mà làm nhé!
Điều đầu tiên, mình cần nói với các bạn là Maven Archetype cũng là một Maven project nhưng packaging của nó không phải là jar, war hay là pom mà có giá trị là “maven-archetype”. Các bạn có thể sử dụng command line hoặc một Java IDE nào đó có hỗ trợ Maven project để generate Maven Archetype project đều được.
Tạo mới Maven Archetype project
Trong bài viết này, mình sẽ sử dụng Eclipse IDE để làm việc với Maven Archetype project.
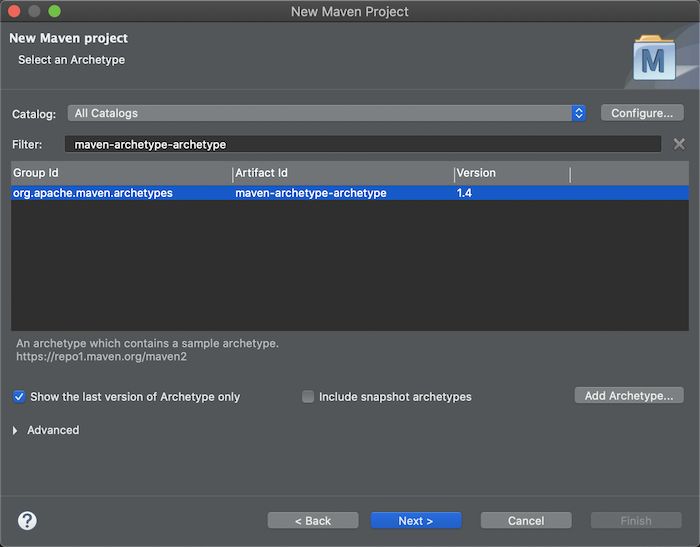
Mình sẽ tạo mới một Maven project sử dụng một Maven Archetype của Maven để generate Maven Archetype project
Maven Archetype này có tên là maven-archetype-archetype:


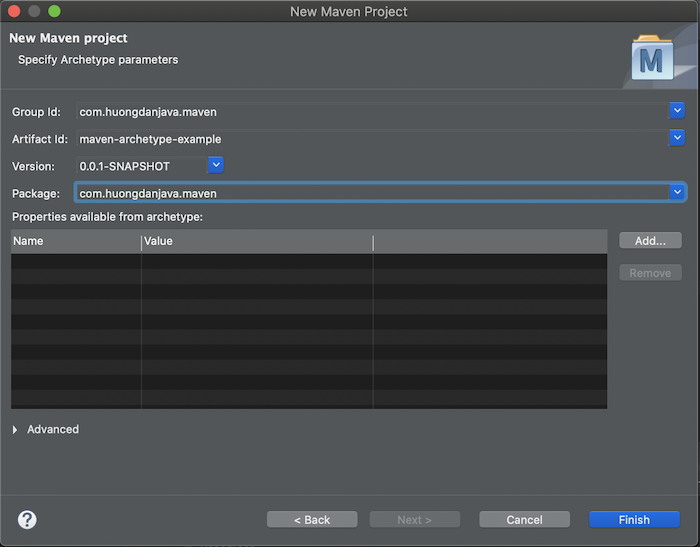
Khai báo thông tin project:


Kết quả:
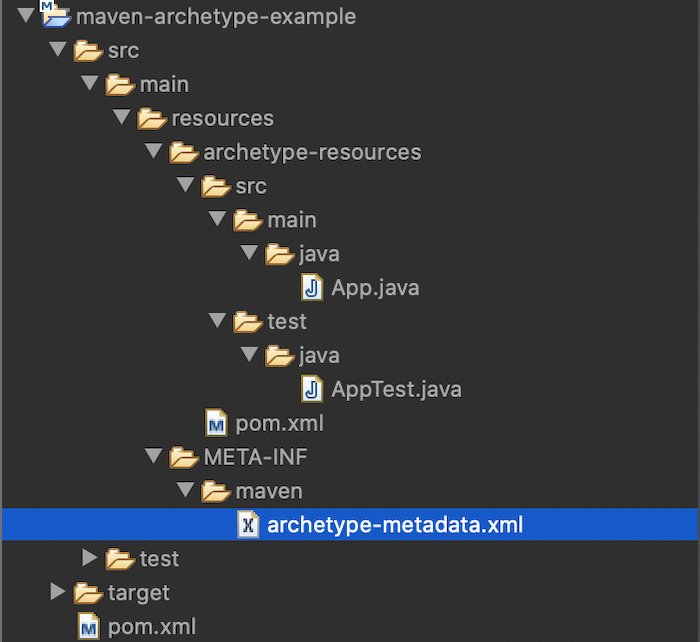


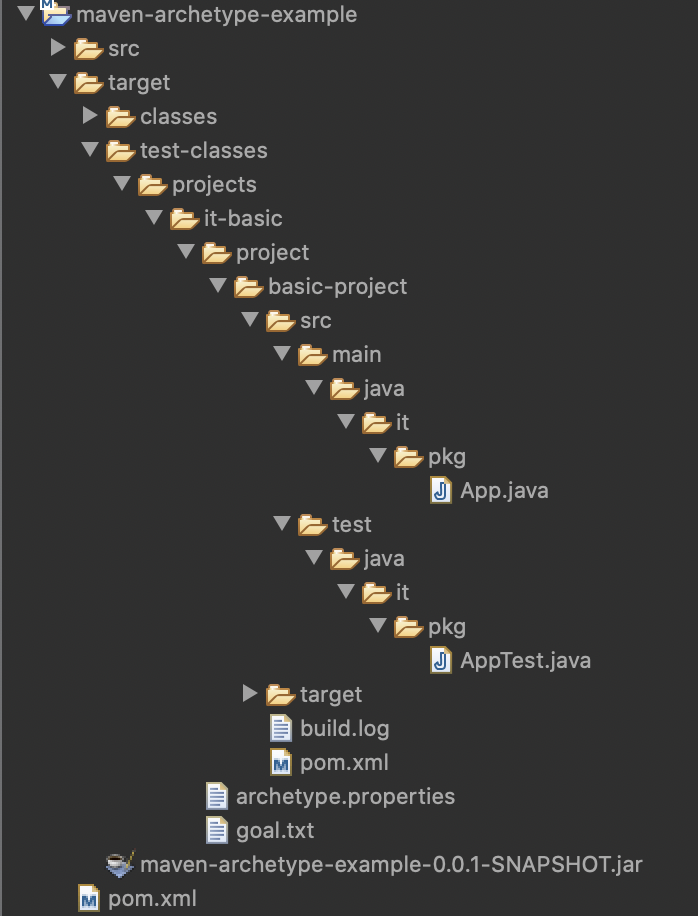
Các tập tin, thư mục nằm trong thư mục src/main/resources/archetype-resources sẽ nằm trong project mà chúng ta generate từ Maven Archetype project. Ví dụ, nếu bây giờ, các bạn chạy “mvn clean install” cho project này (các bạn nên sử dụng command line để chạy, chạy trong Eclipse có thể sẽ có issue liên quan đến “${maven.home} is not specified as a directory”) của Maven plugin, sau đó vào thư mục target/test-classes/projects/id-basic/project, các bạn sẽ thấy một project mới được generate từ Maven Archetype project của chúng ta:


Import Maven project này sử dụng một IDE khác như IntelliJ, các bạn sẽ thấy kết quả như sau:
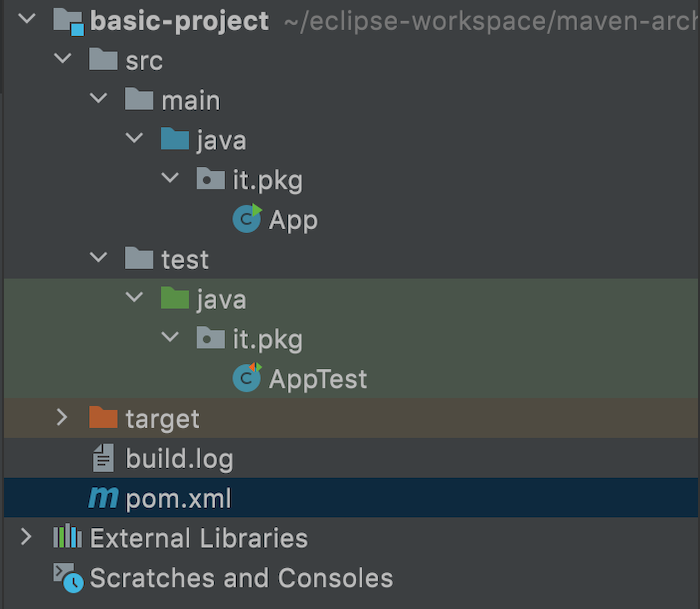


Bây giờ, chúng ta sẽ thử hiện thực Maven Archetype project theo ý của mình nhé!
Hiện thực Maven Archetype project
Để lấy ví dụ cho bài viết này, mình sẽ hiện thực một Spring MVC project dựa trên project template của Spring Tool Suite 3, trong bài viết về Tạo ứng dụng web sử dụng Spring bằng Spring Legacy Project trong Spring Tool Suite 3. Nói cho các bạn hiểu thì Spring MVC project template của Spring Tool Suite 3 đang sử dụng những version cũ của Spring và các library khác, mỗi khi tạo mới project Spring MVC sử dụng nó, mình phải chỉnh sửa lại cho phù hợp với thời điểm hiện tại.
OK, bắt đầu nhé các bạn. Các bạn có thể đọc lại bài viết Tạo ứng dụng web sử dụng Spring bằng Spring Legacy Project trong Spring Tool Suite 3 để hiểu rõ những tập tin thư mục mà mình cần tạo trong Maven Archetype project ví dụ trong bài viết này. Project ví dụ của bài viết trên, mình cũng đã push lên GitHub tại https://github.com/huongdanjavacom/huongdanjava.com/tree/master/spring-mvc-example.
Đầu tiên, chúng ta cập nhập tập tin pom.xml ở thư mục src/main/resources/archetype-resources của Maven Archetype project.
Mình sẽ replace bằng nội dung của tập tin pom.xml trong project spring-mvc-example ở trên, xong chỉnh sửa lại version của các library, framework sử dụng latest version.
Nội dung của tập tin pom.xml của Maven Archetype project lúc này như sau:
Maven Archetype là một tính năng của Maven, các bạn hiểu nôm na là nó cho phép chúng ta tạo nhanh một Maven project với cấu trúc đã được định nghĩa sẵn. Chúng ta chỉ cần thay đổi những giá trị như Group Id, Artifact Id hay Version theo giá trị mà chúng ta muốn mà thôi. Mình thì mình hay sử dụng các Maven Archetype định nghĩa cấu trúc của các project Spring hay Jakarta EE. Trong bài viết này, mình sẽ hướng dẫn các bạn cách hiện thực một Maven archetype để nếu các bạn có ý định hiện thực một Maven Archetype cho riêng mình thì có thể dựa vào hướng dẫn của mình mà làm nhé!
Điều đầu tiên, mình cần nói với các bạn là Maven Archetype cũng là một Maven project nhưng packaging của nó không phải là jar, war hay là pom mà có giá trị là “maven-archetype”. Các bạn có thể sử dụng command line hoặc một Java IDE nào đó có hỗ trợ Maven project để generate Maven Archetype project đều được.
Tạo mới Maven Archetype project
Trong bài viết này, mình sẽ sử dụng Eclipse IDE để làm việc với Maven Archetype project.
Mình sẽ tạo mới một Maven project sử dụng một Maven Archetype của Maven để generate Maven Archetype project
Maven Archetype này có tên là maven-archetype-archetype:


Khai báo thông tin project:


Kết quả:


Các tập tin, thư mục nằm trong thư mục src/main/resources/archetype-resources sẽ nằm trong project mà chúng ta generate từ Maven Archetype project. Ví dụ, nếu bây giờ, các bạn chạy “mvn clean install” cho project này (các bạn nên sử dụng command line để chạy, chạy trong Eclipse có thể sẽ có issue liên quan đến “${maven.home} is not specified as a directory”) của Maven plugin, sau đó vào thư mục target/test-classes/projects/id-basic/project, các bạn sẽ thấy một project mới được generate từ Maven Archetype project của chúng ta:


Import Maven project này sử dụng một IDE khác như IntelliJ, các bạn sẽ thấy kết quả như sau:


Bây giờ, chúng ta sẽ thử hiện thực Maven Archetype project theo ý của mình nhé!
Hiện thực Maven Archetype project
Để lấy ví dụ cho bài viết này, mình sẽ hiện thực một Spring MVC project dựa trên project template của Spring Tool Suite 3, trong bài viết về Tạo ứng dụng web sử dụng Spring bằng Spring Legacy Project trong Spring Tool Suite 3. Nói cho các bạn hiểu thì Spring MVC project template của Spring Tool Suite 3 đang sử dụng những version cũ của Spring và các library khác, mỗi khi tạo mới project Spring MVC sử dụng nó, mình phải chỉnh sửa lại cho phù hợp với thời điểm hiện tại.
OK, bắt đầu nhé các bạn. Các bạn có thể đọc lại bài viết Tạo ứng dụng web sử dụng Spring bằng Spring Legacy Project trong Spring Tool Suite 3 để hiểu rõ những tập tin thư mục mà mình cần tạo trong Maven Archetype project ví dụ trong bài viết này. Project ví dụ của bài viết trên, mình cũng đã push lên GitHub tại https://github.com/huongdanjavacom/huongdanjava.com/tree/master/spring-mvc-example.
Đầu tiên, chúng ta cập nhập tập tin pom.xml ở thư mục src/main/resources/archetype-resources của Maven Archetype project.
Mình sẽ replace bằng nội dung của tập tin pom.xml trong project spring-mvc-example ở trên, xong chỉnh sửa lại version của các library, framework sử dụng latest version.
Nội dung của tập tin pom.xml của Maven Archetype project lúc này như sau:
Maven Archetype là một tính năng của Maven, các bạn hiểu nôm na là nó cho phép chúng ta tạo nhanh một Maven project với cấu trúc đã được định nghĩa sẵn. Chúng ta chỉ cần thay đổi những giá trị như Group Id, Artifact Id hay Version theo giá trị mà chúng ta muốn mà thôi. Mình thì mình hay sử dụng các Maven Archetype định nghĩa cấu trúc của các project Spring hay Jakarta EE. Trong bài viết này, mình sẽ hướng dẫn các bạn cách hiện thực một Maven archetype để nếu các bạn có ý định hiện thực một Maven Archetype cho riêng mình thì có thể dựa vào hướng dẫn của mình mà làm nhé!
Điều đầu tiên, mình cần nói với các bạn là Maven Archetype cũng là một Maven project nhưng packaging của nó không phải là jar, war hay là pom mà có giá trị là “maven-archetype”. Các bạn có thể sử dụng command line hoặc một Java IDE nào đó có hỗ trợ Maven project để generate Maven Archetype project đều được.
Tạo mới Maven Archetype project
Trong bài viết này, mình sẽ sử dụng Eclipse IDE để làm việc với Maven Archetype project.
Mình sẽ tạo mới một Maven project sử dụng một Maven Archetype của Maven để generate Maven Archetype project
Maven Archetype này có tên là maven-archetype-archetype:


Khai báo thông tin project:


Kết quả:


Các tập tin, thư mục nằm trong thư mục src/main/resources/archetype-resources sẽ nằm trong project mà chúng ta generate từ Maven Archetype project. Ví dụ, nếu bây giờ, các bạn chạy “mvn clean install” cho project này (các bạn nên sử dụng command line để chạy, chạy trong Eclipse có thể sẽ có issue liên quan đến “${maven.home} is not specified as a directory”) của Maven plugin, sau đó vào thư mục target/test-classes/projects/id-basic/project, các bạn sẽ thấy một project mới được generate từ Maven Archetype project của chúng ta:


Import Maven project này sử dụng một IDE khác như IntelliJ, các bạn sẽ thấy kết quả như sau:


Bây giờ, chúng ta sẽ thử hiện thực Maven Archetype project theo ý của mình nhé!
Hiện thực Maven Archetype project
Để lấy ví dụ cho bài viết này, mình sẽ hiện thực một Spring MVC project dựa trên project template của Spring Tool Suite 3, trong bài viết về Tạo ứng dụng web sử dụng Spring bằng Spring Legacy Project trong Spring Tool Suite 3. Nói cho các bạn hiểu thì Spring MVC project template của Spring Tool Suite 3 đang sử dụng những version cũ của Spring và các library khác, mỗi khi tạo mới project Spring MVC sử dụng nó, mình phải chỉnh sửa lại cho phù hợp với thời điểm hiện tại.
OK, bắt đầu nhé các bạn. Các bạn có thể đọc lại bài viết Tạo ứng dụng web sử dụng Spring bằng Spring Legacy Project trong Spring Tool Suite 3 để hiểu rõ những tập tin thư mục mà mình cần tạo trong Maven Archetype project ví dụ trong bài viết này. Project ví dụ của bài viết trên, mình cũng đã push lên GitHub tại https://github.com/huongdanjavacom/huongdanjava.com/tree/master/spring-mvc-example.
Đầu tiên, chúng ta cập nhập tập tin pom.xml ở thư mục src/main/resources/archetype-resources của Maven Archetype project.
Mình sẽ replace bằng nội dung của tập tin pom.xml trong project spring-mvc-example ở trên, xong chỉnh sửa lại version của các library, framework sử dụng latest version.
Nội dung của tập tin pom.xml của Maven Archetype project lúc này như sau:
<?xml version="1.0" encoding="UTF-8"?>
<project xmlns="http://maven.apache.org/POM/4.0.0"
xmlns:xsi="http://www.w3.org/2001/XMLSchema-instance"
xsi:schemaLocation="http://maven.apache.org/POM/4.0.0 https://maven.apache.org/maven-v4_0_0.xsd">
<modelVersion>4.0.0</modelVersion>

<groupId>com.huongdanjava</groupId>
<artifactId>springmvc</artifactId>
<name>spring-mvc-example</name>
<packaging>war</packaging>
<version>1.0.0-BUILD-SNAPSHOT</version>

<properties>
<maven.compiler.source>1.8</maven.compiler.source>
<maven.compiler.target>1.8</maven.compiler.target>

<org.springframework-version>5.3.9</org.springframework-version>
<org.aspectj-version>1.9.7</org.aspectj-version>
<org.slf4j-version>1.7.32</org.slf4j-version>
</properties>
<dependencies>
<!-- Spring -->
<dependency>
<groupId>org.springframework</groupId>
<artifactId>spring-context</artifactId>
<version>${org.springframework-version}</version>
<exclusions>
<!-- Exclude Commons Logging in favor of SLF4j -->
<exclusion>
<groupId>commons-logging</groupId>
<artifactId>commons-logging</artifactId>
</exclusion>
</exclusions>
</dependency>
<dependency>
<groupId>org.springframework</groupId>
<artifactId>spring-webmvc</artifactId>
<version>${org.springframework-version}</version>
</dependency>

<!-- AspectJ -->
<dependency>
<groupId>org.aspectj</groupId>
<artifactId>aspectjrt</artifactId>
<version>${org.aspectj-version}</version>
</dependency>

<!-- Logging -->
<dependency>
<groupId>org.slf4j</groupId>
<artifactId>slf4j-api</artifactId>
<version>${org.slf4j-version}</version>
</dependency>
<dependency>
<groupId>org.slf4j</groupId>
<artifactId>jcl-over-slf4j</artifactId>
<version>${org.slf4j-version}</version>
<scope>runtime</scope>
</dependency>
<dependency>
<groupId>org.slf4j</groupId>
<artifactId>slf4j-log4j12</artifactId>
<version>${org.slf4j-version}</version>
<scope>runtime</scope>
</dependency>
<dependency>
<groupId>log4j</groupId>
<artifactId>log4j</artifactId>
<version>1.2.17</version>
<exclusions>
<exclusion>
<groupId>javax.mail</groupId>
<artifactId>mail</artifactId>
</exclusion>
<exclusion>
<groupId>javax.jms</groupId>
<artifactId>jms</artifactId>
</exclusion>
<exclusion>
<groupId>com.sun.jdmk</groupId>
<artifactId>jmxtools</artifactId>
</exclusion>
<exclusion>
<groupId>com.sun.jmx</groupId>
<artifactId>jmxri</artifactId>
</exclusion>
</exclusions>
<scope>runtime</scope>
</dependency>

<!-- @Inject -->
<dependency>
<groupId>javax.inject</groupId>
<artifactId>javax.inject</artifactId>
<version>1</version>
</dependency>

<!-- Servlet -->
<dependency>
<groupId>javax.servlet</groupId>
<artifactId>servlet-api</artifactId>
<version>2.5</version>
<scope>provided</scope>
</dependency>
<dependency>
<groupId>javax.servlet.jsp</groupId>
<artifactId>jsp-api</artifactId>
<version>2.2</version>
<scope>provided</scope>
</dependency>
<dependency>
<groupId>javax.servlet</groupId>
<artifactId>jstl</artifactId>
<version>1.2</version>
</dependency>

<!-- Test -->
<dependency>
<groupId>junit</groupId>
<artifactId>junit</artifactId>
<version>4.13.2</version>
<scope>test</scope>
</dependency>
</dependencies>
<build>
<plugins>
<plugin>
<artifactId>maven-eclipse-plugin</artifactId>
<version>2.10</version>
<configuration>
<additionalProjectnatures>
<projectnature>org.springframework.ide.eclipse.core.springnature</projectnature>
</additionalProjectnatures>
<additionalBuildcommands>
<buildcommand>org.springframework.ide.eclipse.core.springbuilder</buildcommand>
</additionalBuildcommands>
<downloadSources>true</downloadSources>
<downloadJavadocs>true</downloadJavadocs>
</configuration>
</plugin>
<plugin>
<groupId>org.apache.maven.plugins</groupId>
<artifactId>maven-compiler-plugin</artifactId>
<version>3.8.1</version>
<configuration>
<compilerArgument>-Xlint:all</compilerArgument>
<showWarnings>true</showWarnings>
<showDeprecation>true</showDeprecation>
</configuration>
</plugin>
<plugin>
<groupId>org.codehaus.mojo</groupId>
<artifactId>exec-maven-plugin</artifactId>
<version>3.0.0</version>
<configuration>
<mainClass>org.test.int1.Main</mainClass>
</configuration>
</plugin>
<plugin>
<groupId>org.eclipse.jetty</groupId>
<artifactId>jetty-maven-plugin</artifactId>
<version>9.4.43.v20210629</version>
<configuration>
<webApp>
<contextPath>/springmvc</contextPath>
</webApp>
<httpConnector>
<port>8585</port>
</httpConnector>
</configuration>
</plugin>
</plugins>
</build>
</project>
Vấn đề chúng ta cần sửa để cho người dùng khi sử dụng có thể generate groupId, artifactId, version theo nhu cầu của họ là thay đổi cấu hình groupId, artifactId, version trong tập tin pom.xml này.
Chúng ta sẽ định nghĩa 3 properties là ${groupId}, ${artifactId}, ${version} rồi thay thế groupId, artifactId, version trong tập tin pom.xml bằng những properties này, như sau:
<project xmlns="http://maven.apache.org/POM/4.0.0"
xmlns:xsi="http://www.w3.org/2001/XMLSchema-instance"
xsi:schemaLocation="http://maven.apache.org/POM/4.0.0 https://maven.apache.org/maven-v4_0_0.xsd">
<modelVersion>4.0.0</modelVersion>

<groupId>${groupId}</groupId>
<artifactId>${artifactId}</artifactId>
<name>${artifactId}</name>
<packaging>war</packaging>
<version>${version}</version>

...
</project>
Giá trị của các properties này sẽ được người dùng nhập lúc generate project của họ từ Maven Archetype project của chúng ta các bạn nhé.
Tiếp theo, chúng ta sẽ copy class HomeController, package com.huongdanjava.springmvc trong project spring-mvc-example, bỏ vào thư mục src/main/resources/archetype-resources/src/main/java của Maven Archetype project.
Khi generate project sử dụng Maven Archetype, người dùng có thể đặt package name theo tên họ muốn. Câu hỏi đặt ra là làm sao Maven Archetype project của chúng ta có thể generate đúng package mà người dùng muốn. Solution ở đây là chúng ta sẽ khai báo sử dụng properties ${package} để làm điều này.
Ví dụ với class HomeController thì sau khi copy, mình sẽ sửa dòng code khai báo package như sau:
package $package;

import java.text.DateFormat;
import java.util.Date;
import java.util.Locale;
import org.slf4j.Logger;
import org.slf4j.LoggerFactory;
import org.springframework.stereotype.Controller;
import org.springframework.ui.Model;
import org.springframework.web.bind.annotation.RequestMapping;
import org.springframework.web.bind.annotation.RequestMethod;

/**
* Handles requests for the application home page.
*/
@Controller
public class HomeController {

private static final Logger logger = LoggerFactory.getLogger(HomeController.class);

/**
* Simply selects the home view to render by returning its name.
*/
@RequestMapping(value = "/", method = RequestMethod.GET)
public String home(Locale locale, Model model) {
logger.info("Welcome home! The client locale is {}.", locale);

Date date = new Date();
DateFormat dateFormat =
DateFormat.getDateTimeInstance(DateFormat.LONG, DateFormat.LONG, locale);

String formattedDate = dateFormat.format(date);

model.addAttribute("serverTime", formattedDate);

return "home";
}

}
Nếu Maven Archetype project của các bạn có những sub-package nữa, ví dụ như trong project spring-mvc-example của mình, có thêm một package là com.huongdanjava.mvc.test, thì class nằm trong package com.huongdanjava.mvc.test này, cần khai báo dòng code package như sau:
package ${package}.test;
Trong Maven Archetype project ví dụ của mình, class App không cần thiết nữa nên mình sẽ xoá nó đi.
Đối với tập tin log4j.xml trong thư mục src/main/resources thì mình sẽ tạo mới thư mục resouces trong thư mục src/main/resources/archetype-resources/src/main của Maven Archetype project, để copy tập tin này qua.
Để copy các tập tin thư mục trong thư mục webapp của project spring-mvc-example, mình cũng sẽ tạo mới thư mục webapp trong thư mục src/main/resources/archetype-resources/src/main của Maven Archetype project.
Trong thư mục src/main/resources/archetype-resources/src/main/webapp/spring/appServlet có tập tin servlet-context.xml, có khai báo một cấu hình về component-scan của Spring framework, base-package liên quan đến project mà người dùng sẽ generate nên mình sẽ sửa lại sử dụng propery ${package} như sau:
<?xml version="1.0" encoding="UTF-8"?>
<beans:beans xmlns="http://www.springframework.org/schema/mvc"
xmlns:xsi="http://www.w3.org/2001/XMLSchema-instance"
xmlns:beans="http://www.springframework.org/schema/beans"
xmlns:context="http://www.springframework.org/schema/context"
xsi:schemaLocation="http://www.springframework.org/schema/mvc https://www.springframework.org/schema/mvc/spring-mvc.xsd
http://www.springframework.org/schema/beans https://www.springframework.org/schema/beans/spring-beans.xsd
http://www.springframework.org/schema/context https://www.springframework.org/schema/context/spring-context.xsd">

<!-- DispatcherServlet Context: defines this servlet's request-processing infrastructure -->

<!-- Enables the Spring MVC @Controller programming model -->
<annotation-driven />

<!-- Handles HTTP GET requests for /resources/** by efficiently serving up static resources in the
${webappRoot}/resources directory -->
<resources mapping="/resources/**" location="/resources/" />

<!-- Resolves views selected for rendering by @Controllers to .jsp resources in the /WEB-INF/views
directory -->
<beans:bean class="org.springframework.web.servlet.view.InternalResourceViewResolver">
<beans:property name="prefix" value="/WEB-INF/views/" />
<beans:property name="suffix" value=".jsp" />
</beans:bean>

<context:component-scan base-package="${package}" />

</beans:beans>
Class AppTest trong thư mục src/main/resources/archetype-resources/src/test/java không cần nữa, các bạn có thể remove nó đi nhé.
Sau khi đã có những resource cần thiết cho Maven project sẽ được generate, các bạn cần cập nhập tập tin archetype-metadata.xml nằm trong thư mục src/main/resources/META-INF/maven.
Tập tin này dùng để định nghĩa các tập tin, thư mục sẽ được generate thành project mà người dùng muốn. Mặc định thì nội dung của tập tin này như sau:
<?xml version="1.0" encoding="UTF-8"?>
<archetype-descriptor
xmlns="http://maven.apache.org/plugins/maven-archetype-plugin/archetype-descriptor/1.0.0"
xmlns:xsi="http://www.w3.org/2001/XMLSchema-instance"
xsi:schemaLocation="http://maven.apache.org/plugins/maven-archetype-plugin/archetype-descriptor/1.0.0 http://maven.apache.org/xsd/archetype-descriptor-1.0.0.xsd"
name="${artifactId}">

<fileSets>
<fileSet filtered="true" packaged="true">
<directory>src/main/java</directory>
</fileSet>
<fileSet filtered="true" packaged="true">
<directory>src/test/java</directory>
</fileSet>
</fileSets>
</archetype-descriptor>
Đã có thư mục src/main/java và src/test/java được định nghĩa sẵn, chúng ta cần cấu hình thêm cho thư mục src/main/webapp nữa:
<?xml version="1.0" encoding="UTF-8"?>
<archetype-descriptor
xmlns="http://maven.apache.org/plugins/maven-archetype-plugin/archetype-descriptor/1.0.0"
xmlns:xsi="http://www.w3.org/2001/XMLSchema-instance"
xsi:schemaLocation="http://maven.apache.org/plugins/maven-archetype-plugin/archetype-descriptor/1.0.0 http://maven.apache.org/xsd/archetype-descriptor-1.0.0.xsd"
name="${artifactId}">

<fileSets>
<fileSet filtered="true" packaged="true">
<directory>src/main/java</directory>
</fileSet>
<fileSet filtered="true">
<directory>src/main/webapp</directory>
</fileSet>
<fileSet filtered="true" packaged="true">
<directory>src/test/java</directory>
</fileSet>
</fileSets>
</archetype-descriptor>
Các bạn để ý là khi khai báo cho thư mục webapp, mình không khai báo attribute “package=true” trong tag <fileSet>, để Maven Archetype không để thư mục này trong một package.
Đến đây thì chúng ta đã hoàn thành việc hiện thực một Maven Archetype project rồi đó các bạn!
Các bạn có thể chạy lại “mvn clean install” rồi refresh lại project đã import trong IDE như mình ở trên, các bạn sẽ thấy kết quả giống mình như sau:
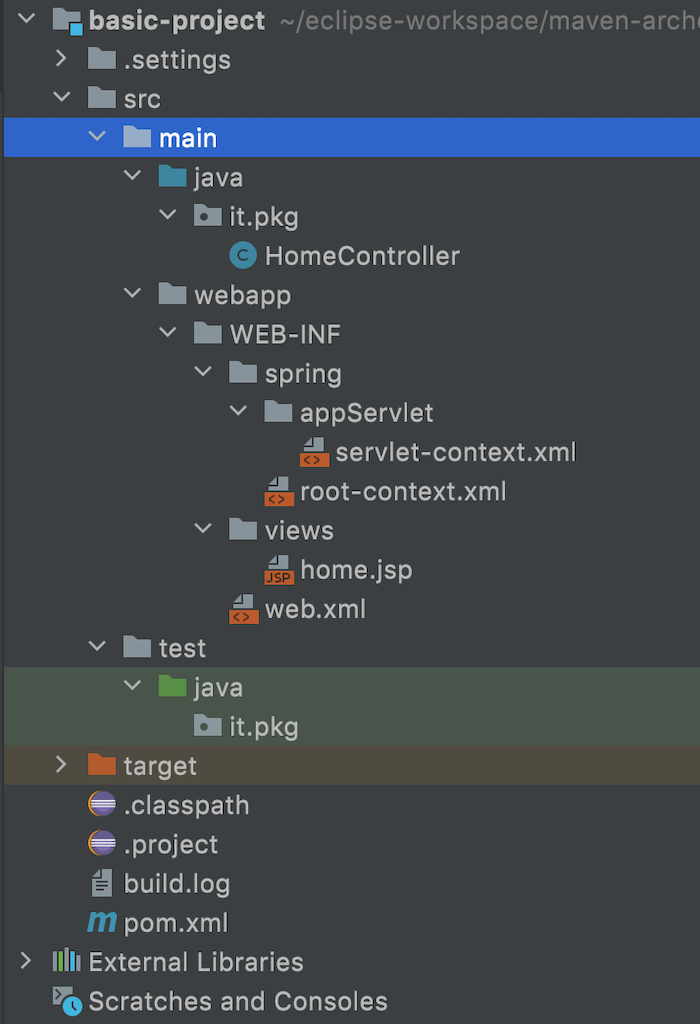

Chạy “mvn clean jetty:run” cho project này, các bạn sẽ thấy kết quả giống như mình làm trong bài viết Tạo ứng dụng web sử dụng Spring bằng Spring Legacy Project trong Spring Tool Suite 3 đó các bạn.
One more thing, các bạn sẽ tự hỏi là groupId, artifactId và version của generated project trong ví dụ của mình lấy ở đâu? Nó nằm trong tập tin archetype.properties ở thư mục src/test/resources/projects/it-basic đó các bạn! Nội dung của tập tin này như sau:
groupId=archetype.it
artifactId=basic-project
version=0.1-SNAPSHOT
package=it.pkg
Tập tin này được maven-archetype-plugin sử dụng để generate project ví dụ cho chúng ta đó các bạn.
Bài viết gốc được đăng tải tại huongdanjava.com
Có thể bạn quan tâm:
- Maven Apache
- Cho phép tùy chọn Giao diện trong Spring Web MVC framework
- Kiểm tra tính hợp lệ của dữ liệu đầu vào form Spring Web MVC bởi Hibernate Validator
Xem thêm Việc làm IT hấp dẫn trên TopDev


