Bài viết được sự cho phép của tác giả Nguyễn Hữu Khanh
Trong bài viết Tổng quan về quy trình xử lý request trong Spring Security, mình đã giới thiệu sơ qua với các bạn về các thành phần chính trong một flow cho phần authentication của Spring Security framework. Trong bài viết này, chúng ta sẽ tìm hiểu chi tiết hơn về cách Spring Security handle phần authentication như thế nào các bạn nhé!
Xem thêm các chương trình tuyển dụng Spring trên TopDev

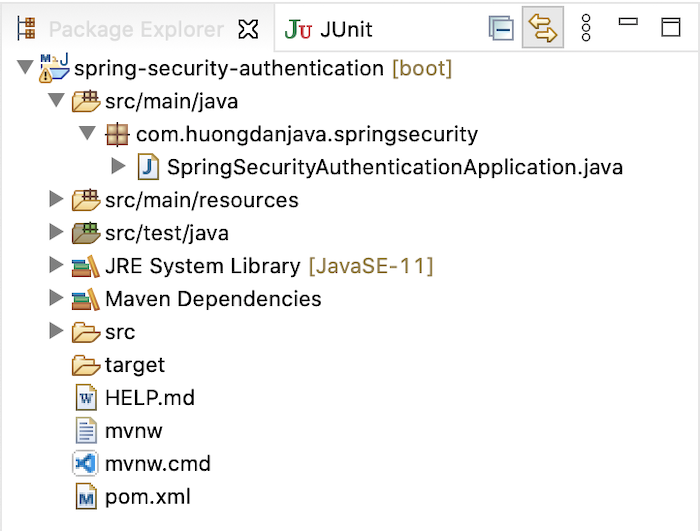
Đầu tiên, mình sẽ tạo mới một Spring Boot project với Spring Security Starter and Spring Web Starter để làm ví dụ.
Kết quả như sau:
Như mình đã nói trong bài viết Tổng quan về quy trình xử lý request trong Spring Security, class AuthenticationManager sẽ là class đảm nhận việc authentication trong Spring Security:
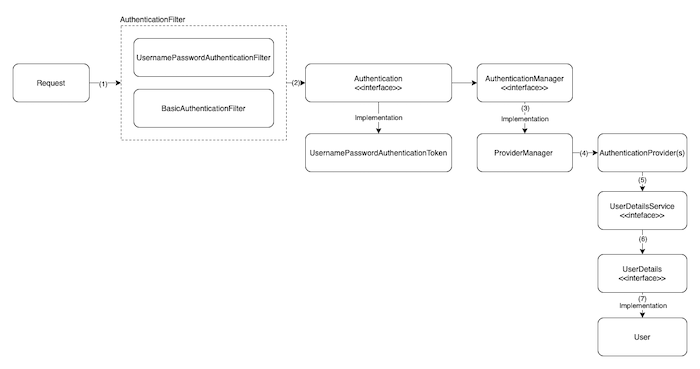
Request sau khi đi qua AuthenticationFilter, thông tin đăng nhập của user sẽ được convert sang đối tượng Authentication với implementation là class UsernamePasswordAuthenticationToken. AuthenticationManager sẽ sử dụng thông tin trong class UsernamePasswordAuthenticationToken để làm authentication.
Mặc định thì Spring hỗ trợ chúng ta authenticate username, password sử dụng class DaoAuthenticationProvider.
Khi authenticate, với thông tin authentication trong class UsernamePasswordAuthenticationToken, Spring Security sẽ lấy thông tin username trong UsernamePasswordAuthenticationToken để kiểm tra trong UserCache đã có thông tin của username này chưa? Không hiểu sao code hiện tại sử dụng cho UserCache lại là:
private UserCache userCache = new NullUserCache();
NullUserCache thì chỉ return null thông tin UserDetails thôi các bạn!
Vì không có thông tin trong cache, nên Spring Security sẽ sử dụng đối tượng của interface UserDetailsService để lấy thông tin UserDetails sử dụng username.
Interface UserDetailsService chỉ có duy nhất 1 abstract method là loadUserByUsername():
public interface UserDetailsService {

UserDetails loadUserByUsername(String username) throws UsernameNotFoundException;
}
Implement của interface UserDetailsService được sử dụng trong trường hợp này là InMemoryUserDetailsManager vì mình ko sử dụng database cho ví dụ trong bài viết này.
Nếu có thông tin user với username mà chúng ta đang gửi lên lúc nhấn nút Login, đối tượng UserDetails chứa thông tin của user đó sẽ được return về.
Ở đây Spring Security còn làm thêm vài thao tác check user nữa trước khi check thông tin password của user: bao gồm check user có bị lock không, user có đang enable không và user có bị expired không?
Class DefaultPreAuthenticationChecks implement interface UserDetailsChecker được sử dụng để làm điều này với phương thức check().
Spring Security sẽ check thông tin password mà user truyền, có giống với thông tin trong hệ thống không? Sử dụng phương thức additionalAuthenticationChecks().
Ở đây, thông tin password sẽ tuỳ vào encoder mà chúng ta đang configure với Spring Security thì class Encoder tương ứng sẽ được sử dụng trong quá trình check password.
Sau khi đã check thông tin password xong, Spring Security sẽ có bước kiểm tra xem password có bị expired không sử dụng class DefaultPostAuthenticationChecks với phương thức check().
Trong quá trình handle authentication flow, nếu bất cứ exception gì xảy ra, thì interface AuthenticationFailureHandler với implementation SimpleUrlAuthenticationFailureHandler sẽ handle exception này.
Còn nếu mọi thứ diễn ra trơn tru, không có lỗi gì cả thì interface AuthenticationSuccessHandler với implementation là class SavedRequestAwareAuthenticationSuccessHandler sẽ handle..
Chi tiết cho những điều đã xảy ra ở trên, các bạn có thể đọc thêm code của class AbstractAuthenticationProcessingFilter phương thức private doFilter():
private void doFilter(HttpServletRequest request, HttpServletResponse response, FilterChain chain)
throws IOException, ServletException {
if (!requiresAuthentication(request, response)) {
chain.doFilter(request, response);
return;
}
try {
Authentication authenticationResult = attemptAuthentication(request, response);
if (authenticationResult == null) {
// return immediately as subclass has indicated that it hasn't completed
return;
}
this.sessionStrategy.onAuthentication(authenticationResult, request, response);
// Authentication success
if (this.continueChainBeforeSuccessfulAuthentication) {
chain.doFilter(request, response);
}
successfulAuthentication(request, response, chain, authenticationResult);
}
catch (InternalAuthenticationServiceException failed) {
this.logger.error("An internal error occurred while trying to authenticate the user.", failed);
unsuccessfulAuthentication(request, response, failed);
}
catch (AuthenticationException ex) {
// Authentication failed
unsuccessfulAuthentication(request, response, ex);
}
}
class UsernamePasswordAuthenticationFilter với phương thức attemptAuthentication():
@Override
public Authentication attemptAuthentication(HttpServletRequest request, HttpServletResponse response)
throws AuthenticationException {
if (this.postOnly && !request.getMethod().equals("POST")) {
throw new AuthenticationServiceException("Authentication method not supported: " + request.getMethod());
}
String username = obtainUsername(request);
username = (username != null) ? username : "";
username = username.trim();
String password = obtainPassword(request);
password = (password != null) ? password : "";
UsernamePasswordAuthenticationToken authRequest = new UsernamePasswordAuthenticationToken(username, password);
// Allow subclasses to set the "details" property
setDetails(request, authRequest);
return this.getAuthenticationManager().authenticate(authRequest);
}
và phương thức authenticate() trong class AbstractUserDetailsAuthenticationProvider:
@Override
public Authentication authenticate(Authentication authentication) throws AuthenticationException {
Assert.isInstanceOf(UsernamePasswordAuthenticationToken.class, authentication,
() -> this.messages.getMessage("AbstractUserDetailsAuthenticationProvider.onlySupports",
"Only UsernamePasswordAuthenticationToken is supported"));
String username = determineUsername(authentication);
boolean cacheWasUsed = true;
UserDetails user = this.userCache.getUserFromCache(username);
if (user == null) {
cacheWasUsed = false;
try {
user = retrieveUser(username, (UsernamePasswordAuthenticationToken) authentication);
}
catch (UsernameNotFoundException ex) {
this.logger.debug("Failed to find user '" + username + "'");
if (!this.hideUserNotFoundExceptions) {
throw ex;
}
throw new BadCredentialsException(this.messages
.getMessage("AbstractUserDetailsAuthenticationProvider.badCredentials", "Bad credentials"));
}
Assert.notNull(user, "retrieveUser returned null - a violation of the interface contract");
}
try {
this.preAuthenticationChecks.check(user);
additionalAuthenticationChecks(user, (UsernamePasswordAuthenticationToken) authentication);
}
catch (AuthenticationException ex) {
if (!cacheWasUsed) {
throw ex;
}
// There was a problem, so try again after checking
// we're using latest data (i.e. not from the cache)
cacheWasUsed = false;
user = retrieveUser(username, (UsernamePasswordAuthenticationToken) authentication);
this.preAuthenticationChecks.check(user);
additionalAuthenticationChecks(user, (UsernamePasswordAuthenticationToken) authentication);
}
this.postAuthenticationChecks.check(user);
if (!cacheWasUsed) {
this.userCache.putUserInCache(user);
}
Object principalToReturn = user;
if (this.forcePrincipalAsString) {
principalToReturn = user.getUsername();
}
return createSuccessAuthentication(principalToReturn, authentication, user);
}
các bạn nhé!
Các bạn có thể chạy debug, add breakpoint vào những phương thức này, để hiểu thêm về cách Spring Security đang xử lý cho phần authentication nha các bạn.
Sau khi hiểu chi tiết xong thì các bạn có thể add custom authentication filter như mình đã làm trong bài viết Custom authentication filter đăng nhập không cần password trong Spring Security dễ dàng, tuỳ theo mục đích của các bạn!
Bài viết gốc được đăng tải tại huongdanjava.com
Có thể bạn quan tâm:
- Custom authentication filter đăng nhập không cần password trong Spring Security
- Custom login page sử dụng Bootstrap và Thymeleaf trong Spring Security
- Sử dụng Spring Security trong Spring Boot
Xem thêm nhiều công việc IT hấp dẫn trên TopDev