Bài viết được sự cho phép bởi tác giả Sơn Dương
Các bài trước mình đã hướng dẫn các bạn sử dụng Sqlite và Realm database. Tuy nhiên, vẫn còn một giải pháp thao tác với database cũng rất hay ho khác. Đó chính là Room database trong Android.
Vậy Room Database là gì? Cách sử dụng Room database như thế nào?
Chúng ta sẽ cùng nhau tìm hiểu thông qua một dự án ví dụ nhé.
#Giới thiệu Room database trong Android
Room database được phát triển và cải tiến từ sqlite. Room database giúp đơn giản hoá việc code,và giảm thiểu các công đoạn liên quan đến cơ sở dữ liệu.
Bản chất Room database là abstract layer gồm cơ sở dữ liệu chuẩn SQLite được Android thông qua.
Với 3 thành phần chính là: Database, DAO (Data Access Object) và entity. Mỗi thành phần đều có nhiệm vụ và chức năng riêng.
#Xây dựng ứng dụng sử dụng Room database trong Android
1. Cài đặt thư viện
Đầu tiên các bạn import thư viện vào file build.gradle
dependencies {
...
    implementation 'android.arch.persistence.room:runtime:' + rootProject.archRoomVersion;
...
}
2. Xây dựng layout
Ứng dụng demo có giao diện để khi nhập các thông tin và lưu xong data sẽ tự đọc ra và fill vào textview.
Giao diện của ứng dụng sẽ giống như bên dưới:
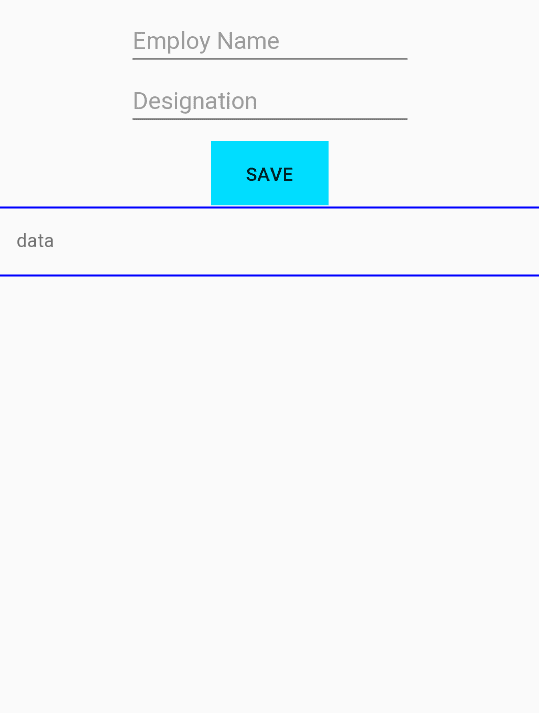

Toàn bộ code của layout như sau:
<?xml version="1.0" encoding="utf-8"?>
<LinearLayout xmlns:android="http://schemas.android.com/apk/res/android"
xmlns:app="http://schemas.android.com/apk/res-auto"
    xmlns:tools="http://schemas.android.com/tools"
    android:layout_width="match_parent"
    android:layout_height="match_parent"
    android:gravity="center_horizontal"
    android:orientation="vertical">

    <EditText
        android:id="@+id/etName"
        android:layout_width="wrap_content"
        android:layout_height="wrap_content"
        android:layout_marginLeft="8dp"
        android:layout_marginRight="8dp"
        android:layout_marginTop="10dp"
        android:ems="10"

        android:hint="Employ Name"
        android:inputType="textPersonName|textCapWords"
        android:singleLine="true"
        app:layout_constraintLeft_toLeftOf="parent"
        app:layout_constraintRight_toRightOf="parent"
        tools:layout_editor_absoluteY="7dp" />

    <EditText
        android:id="@+id/etDesignation"
        android:layout_width="wrap_content"
        android:layout_height="wrap_content"
        android:layout_marginLeft="8dp"
        android:layout_marginRight="8dp"
        android:ems="10"
        android:hint="Designation"
        android:inputType="textPersonName|textCapWords"
        android:singleLine="true"
        app:layout_constraintLeft_toLeftOf="parent"
        app:layout_constraintRight_toRightOf="parent"
        tools:layout_editor_absoluteY="75dp" />

    <Button
        android:background="@android:color/holo_blue_bright"
        android:id="@+id/button"
        android:layout_width="wrap_content"
        android:layout_height="wrap_content"
        android:layout_marginTop="8dp"
        android:text="Save"
        app:layout_constraintTop_toBottomOf="@+id/editText2" />

    <ScrollView
        android:layout_width="match_parent"
        android:layout_height="wrap_content"
        android:padding="16dp">

    <TextView
        android:text="data"
        android:id="@+id/txt_list"
        android:layout_width="match_parent"
        android:layout_height="wrap_content" />
    </ScrollView>

</LinearLayout>
3. Tạo cấu trúc rom database trong Android
Chúng ta sẽ chia phần tương tác với database thành 3 class:
- Employee: Entity nơi định nghĩa bảng và trường của Database. Mỗi 1 Entity tương đương với 1 bảng trong Database.
- EmployDao: Interface định nghĩa các câu truy vấn Database
- AppDatabase: Class này extends từ RoomDatabase là nơi thao tác trực tiếp và thực hiện các truy vấn xuống Database.
Bây giờ mình sẽ hường dẫn các bạn tạo từng class một.
Đầu tiên các bạn tạo class Employee.
@Entity
public class Employee {
    @PrimaryKey(autoGenerate = true)
    public long employId;
    @ColumnInfo(name = "employ_name")
    public String name;
    public String designation;
}
Sau đó các bạn tạo interface để thực hiện truy vấn.
DAO là interface được chú thích với @Dao, nó đóng vai trò trung gian truy cập vào các đối tượng trong cơ sở dữ liệu và các bảng của nó.
Có bốn chú thích cụ thể cho các hoạt động cơ bản của DAO: @Insert, @Update, @Delete, and @Query.
@Dao
public interface EmployDao {
    @Insert(onConflict = REPLACE)
    void insertEmploy(Employee employee);

    @Insert(onConflict = IGNORE)
    void insertOrReplaceEmploy(Employee... employees);

    @Update(onConflict = REPLACE)
    void updateEmploy(Employee employee);

    @Query("DELETE FROM Employee")
    void deleteAll();

    @Query("SELECT * FROM Employee")
    public List<Employee> findAllEmploySync();
}
Và cuối cùng các bạn tạo AppDatabase.
Thành phần Database là một abstract class đã được chú giải bằng @Database. Nó extend RoomDatabase Class và trong đó định nghĩa một danh sách các Entities và các DAO.
@Database(entities = {Employee.class}, version = 1)
public abstract class AppDatabase extends RoomDatabase {
    private static AppDatabase INSTANCE;
    public abstract EmployDao employDao();
    public static AppDatabase getInMemoryDatabase(Context context) {
        if (INSTANCE == null) {
            INSTANCE =
Room.inMemoryDatabaseBuilder(context.getApplicationContext(), AppDatabase.class)
                           // To simplify the codelab, allow queries on the main thread.
                           // Don't do this on a real app! See PersistenceBasicSample for an example.
                           .allowMainThreadQueries()
                           .build();
        }
         return INSTANCE;
    }
    public static void destroyInstance() {
        INSTANCE = null;
    }
}
4. Tạo các hàm trong MainActivity để xử lý logic
Sau khi các bạn ánh xạ giao diện xong chúng ta bắt đầu code logic. Khi click vào button lưu mình sẽ gọi hàm insert.
Khi insert thành công thì đọc luôn database để hiển thị lên giao diện.
//Hàm xử lý click
Employee employee = new Employee();
employee.name = name;
employee.designation = designation;
mDb.employDao().insertEmploy(employee);
Toast.makeText(this, "Saved successfully", Toast.LENGTH_SHORT).show();
etName.setText("");
etDesignation.setText("");
etName.requestFocus();
populateEmployList();
Kết quả chúng ta thu được ứng dụng như demo bên dưới:


Tham khảo thêm về cách xử lý sự kiện trong android: Xử lý sự kiện trong Android (Event Listeners) bằng Kotlin
Tìm việc làm Android lương cao trên TopDev!
#Tạm kết
Như vậy, mình đã hướng dẫn các bạn từng bước sử dụng Room database trong Android. Với Room database, nhưng thao tác đọc, ghi database trở lên dễ dàng hơn bao giờ hết.
Bạn có thấy như vậy không? Toàn bộ source code của bài hướng dẫn, các bạn download ở đây nhé. Download Complete Code
Hy vọng bài viết sẽ giúp các bạn làm được và hiểu chi tiết cấu trúc và làm các dự án nâng cao hơn sau này!
Bài viết gốc được đăng tải tại vntalking.com
Xem thêm:
- Service trong Android là gì? Các loại service trong android
- 10 tài liệu lập trình Android miễn phí từ cơ bản đến nâng cao
- Clean Code Android: Bạn đã thật sự hiểu đúng chưa?
Tìm việc làm IT mọi cấp độ tại TopDev!


